
Customer Support
SSL installation steps
Please note that our certificates can also be installed in hosting packages other than Top.Host, while in the guide below you can find instructions for different types of web servers. Create a CSR
- Create a CSR
To start the process of activating your certificate you will need to generate the CSR, which contains coded information and is generated by your server using its keys.
Below you can find instructions for creating the CSR on various types of web servers and control panels:
- Instructions for creating a CSR in Plesk Onyx
- Instructions for creating a CSR in Cpanel 11
- Instructions for generating CSRs in Apache
NOTE: Along with the creation of the CSR, the private key is also created. The private key is unique and in case of loss or accidental deletion of the SSL, it is lost and cannot be recovered by the competent authority like the rest of the keys, so the certificate needs to be reissued with a new private key.
2. Create administrator email
A necessary step for activating your certificate is the existence of an administrator email so that the corresponding confirmation can be made by the issuing authority.
In this step the issuing authority will send you an email through which you will need to confirm the activation of your certificate.
The acceptable administrator email formats are the following:
admin@yourdomain
administrator@yourdomain
webmaster@yourdomain
hostmaster@yourdomain
- Instructions for creating an administrator email in Plesk.
- Instructions for creating an administrator email in cPanel.
NOTE: In case it is not possible to create via administrator email, see here alternative methods of authentication.
3. SSL managemen
Upon purchase, your SSL has been added to your myTophost Panel, where you can manage it and proceed with the activation process by following these steps:
a. After you have generated the CSR you will need to login to your myTophost Panel.
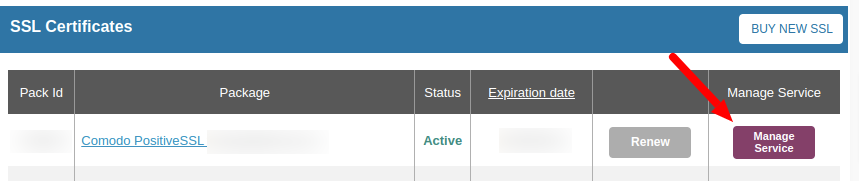
b. Under My Services under the SSL Certificates category, select Manage Service for the certificate you want to activate.
c. Select your hosting type (Linux or Windows) and then enter the CSR in the corresponding field.
CSR should start with
-----BEGIN CERTIFICATE REQUEST-----
and to end with
-----END CERTIFICATE REQUEST-----
Then, fill in the details of Administrator, Billing Manager and Technical Manager and press Continue.
ATTENTION: In the email field, enter your personal email.

d. Select from the drop down menu on the next page the email to which you want to receive instructions for the last step of activating your certificate from the respective issuing authority. Click Submit to complete the process.
- Confirm the process from the email you will receive in the admin emailOnce you press Send in the above step an approval email will be sent to the email you selected. Click on the approval link that will be sent to you. The keys will be sent to the management email within the next 2 hours from the moment you click on the approval link.
5.Contact with issuing authority
In case the certificate you purchased is Organization Validated or Extended Validated, the respective issuing authority (Symantec, GeoTrust, etc.) gives you relevant instructions in the approval email you received, to proceed with the issuing process. There are listed the documents that you should send in order to certify the organization for which you requested the certificate.
You can see relevant information about the documents you will be asked for in the following articles:
What documents do I need for Thawte?
What documents do I need for Geotrust EV?
What documents do I need for Comodo OV Instant?
What documents do I need for Comodo EV?
What documents do I need for Comodo OV?
Important note! We recommend that you keep these documents, as the issuing authority will ask you to resubmit them when renewing your Organization or Extended Validated SSL.
6.SSL installation
After you have issued the CSR and the issuing authority has sent you the certificate you will need to install it on your server.
Additional information
In the event that you have installed SSL on your site and a green padlock does not appear in the upper left corner of the browser, there is a possibility that some URLs on your site do not display the green padlock, even though you have performed the actions described above.
In this case, you can right-click on your browser and select Inspect >> Console so that the browser will indicate the changes you need to make to the content of the specific URL (mixed content). Alternatively, you can use the reliable whynopadlock diagnostic tool which tells you in bulk what changes you need to make.
This content can be, for example, a photo or a link that is not "served" with HTTPS but with HTTP.
-If you have created your site through WordPress, follow the instructions described here
- If you have created your site through Joomla, follow the instructions described here.
You haven't found what you are looking for?
Contact our experts, they will be happy to help!
Contact us